With the adoption of machine control for construction, the ability of various GIS systems to accept 3D data, and now with the expansion of the term BIM to cover elements outside of a building proper, surface modeling has become a critical aspect of any project. Since so many elements down the line rely on the surface model, it is critical that the model be as accurate as possible and free of errors. This article will be the first in a series that will take a look at various tools and options within the Carlson product line to ensure the accuracy of your surface models, sometimes known as triangulated irregular networks (TIN) or digital terrain models (DTM).
In this first article, we will take a look at quality assurance/quality control (QA/QC) and how it applies to surface modeling. This is an essential step of the model building process, and one that is often overlooked by software manufacturers. For most people, the QA/QC process generally involves examining the contours and looking for issues, or spot-checking points on the surface. All current surface modeling software allows for the generation of contours and spot-checking, but these rely on the user to manually review the entire surface after it has been built.
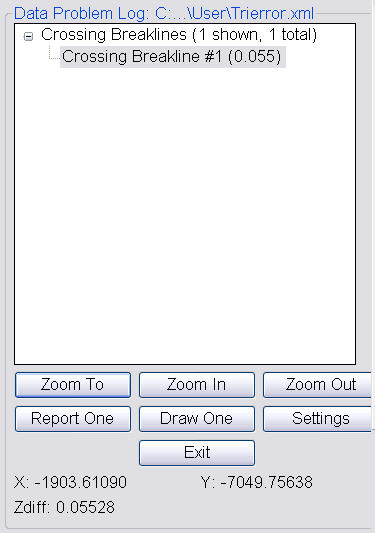
Carlson Software is one of the few products that include an error checker as part of the surface building process. Most other programs either return a generic error message, or simply fail to complete. If you use the Triangulate & Contour routine, an error log is displayed showing any major issues after the surface data is processed.

The issues listed include the following:
- Crossing breaklines
- T-Intersections between breaklines
- Vertical faces
If there are no issues with a surface model, the error log is not displayed. You can use the various options to change the sensitivity of the error checker, and to highlight any issues found. Simply select a single error on the log, then click Zoom In. You can then either correct the errors using any of the surface editing tools, edit the original data (such as the breaklines) and rebuild, or choose to ignore the errors if they are minor.
Although no errors may be found as part of the surface creation, there may still be errors in the surface model resulting from bad data. Once the surface has been built and any build errors have been corrected, you should do a manual review of the spot elevations and contours. The easiest way to check and verify spot elevations in Carlson is by using the Surface Inspector, which is available from the Surface pull-down menu of various modules. After you select the Surface Inspector command, you can change options as to which surface(s) you want to examine, as well as labeling settings. Once this has been done, move your cursor over the surface previously specified and a floating dialog box will show you information about that surface. Click anywhere on the surface to label a specific point.

Press Enter to exist the Surface Inspector.
By taking just a little time to verify that your surface model is accurate and free of errors, you can save time, money, and effort in the later stages of your projects. The Surface Error Log is an invaluable tool for locating any errors and flagging them for editing at a later time. The next article in this series will look at checking a surface model using contours.