This blog is in the process of being transferred to www.ThatCADGirl.com. Please join us there.
Originally posted on Carlson Connection by Jennifer Dibona
This blog is in the process of being transferred to www.ThatCADGirl.com. Please join us there.
Carlson Software released the 2012 version of their desktop software products today. A complete list of Improvements in 2012 can be found here. The newest version can be downloaded here. Current customers who are eligible for automatic upgrade to 2012 can automatically generate your new 2012 serial number by following this link and providing your current 2011 serial number.
Products released today include Civil Suite, Survey, Civil, Hydrology, GIS, Point Cloud, Construction and Takeoff among others. Only the products for installation with IntelliCAD or on top of your AutoCAD have been released at this time. The versions of Survey and Takeoff with embedded AutoCAD will be released in the next several weeks.
After so many years keeping their prices the same, you will notice that Carlson has slightly increased the prices of Civil Suite, Survey, Civil, Hydrology & GIS. In my opinion and even with the price increase, Carlson continues to offer the most bang for the buck when compared to other civil/survey/construction packages on the market today.
To find out about purchasing or upgrading, you can visit our new Online Store or our Carlson Pricing & Upgrades page. Or, feel free to call 919.417.8351 or Email Us with questions.
Or maybe I should say, “We’re now on Facebook… again”! Kudos to those few people who stumbled onto the Facebook account I played around with and forgot to delete months ago, but a new That CAD Girl Facebook page has now been launched.
I plan to use Facebook as the primary method of keeping everyone up to date on the latest events & training classes and news about Carlson and Autodesk software releases. Hope to see you there!
We are finally able to announce our end of year workshops for 2011. With the weather problems we encountered last year we decided to hold the events in the western end of North Carolina in November and toward the coast in December.
The cost to attend each event is $99 and lunch is included. See below for early bird registration details for each event. NC Licensed Surveyors and Engineers will receive 8 PDH credits and all attendees will receive a certificate confirming their attendance. We will have door prizes, software giveaways and special software or hardware pricing that is available the day of the show only.
We will be in Statesville on Tuesday, November 15th and Asheville on Thursday November 17th. Early bird registration is $89 through September 30th.
We will be in Wilmington on Tuesday, December 13th and Raleigh on Thursday December 15th. Early bird registration is $89 through October 31st.
You will be able to choose the sessions you wish to attend. This year’s sessions include:
Note that all classes are not scheduled at all events and locations. See each workshop announcement for specifics. Seats are limited so register online, call 919.417.8351 or email us to register.
This article originally appeared in the September 2011 issue of Professional Surveyor magazine.
| DEFINITIONSField to Finish—A general term used to describe the process of automatically drawing survey field data based on point descriptions and other field codes.Field Code (Description Key)—An alphanumeric code, corresponding to the point’s description, that defines how points are processed using Field to Finish. For points to be sorted onto a particular layer, be included in a point group, have a symbol inserted, or have linework that connects points be automatically generated, a Field Code having the point’s description must first be created.Field Code File (Description Key File)—A file that contains all of the Field Codes.
Linework Codes—Codes entered before or after a point description that, when processed using Field to Finish, indicate where linework starts and ends or how to create additional, associated linework. |
Somewhat like the seemingly Herculean task of developing CAD standards that I wrote about in the June issue, Field to Finish is one of those topics that almost everyone attending my workshops or training classes wants to learn more about. If they are not using Field to Finish, they think they should be—and, if they are already using it, they think they could be doing more or doing it better.
For those who are unfamiliar with it, Field to Finish is a general term used to describe the process of automatically drawing survey field data based on point descriptions and other field codes.
Depending on the survey software you use, Field to Finish may include some or all of these tasks:
Although most survey programs can perform these or other tasks that fall under the Field-to-Finish header, to my knowledge, Carlson Survey is the only one to have commands or files that are actually named “Field to Finish.”
Land Desktop and AutoCAD Civil 3D use the term “Description Keys” for their feature that sorts points onto separate layers and inserts, rotates, and scales symbols. A separate feature called “Automatic Linework” or “Process Survey Linework” generates the polyline figures in these programs. For purposes of this article, Field to Finish refers to the generic term and, unless otherwise specified, applies to any survey program.
 Benefits
For those who have never used Field to Finish, it can be summarized in one word: intimidating! But once you see what can be accomplished with a little extra coding, I believe you’ll be convinced it’s worth it. Because a picture is worth a thousand words, it’s easier to show you the benefits of Field to Finish.
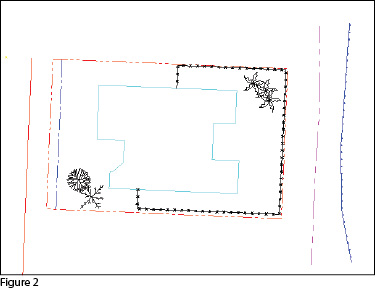
However, if you use Field to Finish to import the points into the drawing, it looks like Figure 2. The points have been frozen in this view, but you can see the symbols and 2D and 3D linework that have been generated on their proper layers.
 Granted, these examples demonstrate the power of Field to Finish when used to its fullest capacity, and it does require additional time and attention in the field to generate these results. In my training classes I encounter a lot of skepticism from folks who don’t believe the extra time in the field is worth it. While it may look cool, they say, it’s just easier to sort to layers, insert symbols, and connect the dots manually back in the office.
I respectfully disagree—and I believe that tackling significant changes in procedure is best accomplished with bite-size pieces rather than one big bite. Do you remember how you’re supposed to eat an elephant? One bite at a time, of course!
| Point Description ConsistencyRegardless of the level of Field to Finish automation you strive for, the single biggest key to success with Field to Finish is consistency among the point descriptions. If you are attempting to implement Field to Finish for the first time and want to ensure buy-in from your field crews, allow them to help develop the list of descriptions. After all, they are the ones having to enter them in the field. If the folks in the field are not consistent with the descriptions they enter for each shot, Field to Finish is doomed to fail.For instance, in the office, it doesn’t matter whether the description for a fire hydrant is “FH,” “HYD,” or “FIRE HYDRANT.” Once the Field Code File has been created, it’s simply a matter of processing the Field to Finish routine. So, rather than someone in the office dictating what descriptions the field crew should use, ask the crew what description makes most sense to them and what they are confident they can remember and enter every single time. |
Even though the “nibble” part seems simple enough, it still requires a considerable amount of thought and consideration. So, how do you start? First, determine what descriptions will be used for shots taken in the field. In order to use Field to Finish, you will need to create a field code for each description that may be processed now or in the future.
Start by going back to one or two of the largest point files you’ve worked on recently and sort it out based on the point descriptions in it. Use this list as a guide to determine what descriptions to keep and what to throw out and also to trigger your memory for other descriptions that may be used in the future.
Once you’ve completed your list of descriptions, each description must be defined as a Field Code (Description Key) in the software. It’s during this step that layers can be assigned for the points, symbols can be specified for insertion, point groups can be defined, and non-surface points can be tagged. Depending on the software you use, the dialog boxes and interface will be different, but the data and settings entered are generally the same.
For Carlson Software users, there is a routine in the “Draw Field to Finish” dialog box that automatically creates a Field Code Table (populated with Field Codes) from a Coordinate File. If you’re not using Carlson Survey, I recommend opening your point file in Microsoft Excel to sift through and sort the list of descriptions.

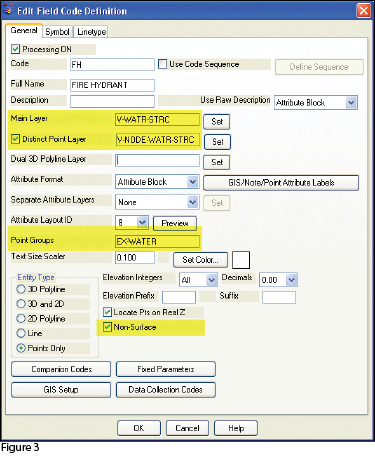 The Field Code that processes points with an FH description, as defined in Carlson Survey 2012, is shown in Figure 3. On the “General” tab of the dialog box, note the highlighted areas that show the layers, point group, and the checkbox to tag points as non-surface. Importing points with an FH description and using the “FH” Field Code definition results in the symbol named SPT16 being inserted on the layer V-WATR-STRC, the point being inserted on layer V-NODE-WATR-STRC, and the point included in a point group named EX-WATER.
The “Symbol” tab of the dialog box (Figure 4) is where you specify the symbol name and various other rotation, scale, and insertion settings.
As I stated previously, it’s a reasonable goal to get to the point where Field to Finish is used to sort points and/or symbols onto their proper layers and into point groups and to tag some points as non-surface to keep them from being included in a surface model. These are office-only tasks, because using Field to Finish to complete them does not require anything from the field crew other than consistency when entering point descriptions.However, the ultimate goal is having Field to Finish connect all of your points with 2D and/or 3D linework. Compared to the previous tasks, this requires more buy-in from the field crew because of the additional coding and noting.
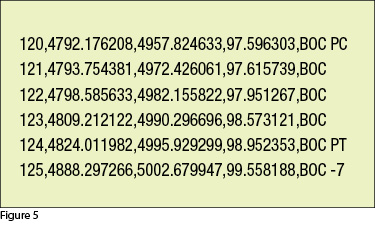 In Figure 5 you can see the linework coding that has been added to the “BOC” (Back of Curb) point descriptions in the sample of the point file. The “+7” linework code instructs the program to begin drawing linework, and the “-7” instructs it to stop drawing that piece of linework. The “PC” and “PT” identify the starting and ending points of a curve that fit all points in between the PC and PT.

 And this is just a sample of what can be done using Field to Finish. Depending on your software and data collector firmware, there are many other linework codes that can be used to automate the creation of linework based on your point descriptions and notes. In some cases there are specific linework codes that must be used, such as “B” for Begin linework (instead of the +7 used above) or “E” for End linework (instead of -7). Other programs, like Carlson, allow you to customize these codes. The “Special Codes” dialog box in Figure 7 shows the default linework codes used in Carlson Survey 2012.
I have one last piece of advice for those who are considering jumping into the world of Field to Finish for the first time. Cheat! Well, kinda. Every survey program with a Field to Finish feature has sample files that you can use as-is or modify to meet your needs. Rather than starting from scratch, it’s sometimes easier to work with one of those prepared files.
As always, I encourage you to send your feedback or contact me with questions at [email protected].
This article originally appeared in the September 2011 issue of Professional Surveyor magazine.