Did you know… about DWG to PDF?

Since I have to send so many files to different people in PDF format, I purchased Adobe Acrobat several years ago. Once installed, “Adobe PDF” shows up in my list of available printers just like my HP or Brother printers do. There are also several other programs available online that allow you to create a PDF printer. Although I’ve never used them, I’ve heard good things about CutePDF and Sourceforge PDF Creator and I’ve used Win2PDF in the past. Each of these have a free version but you may end up getting a watermark or footer or 2nd page that states you’re using a Free copy.

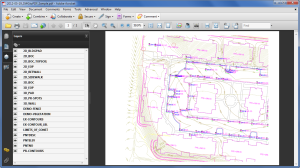
Any of these can be installed and will be shown as an available printer in the Plot dialog box of AutoCAD or IntelliCAD. Several years ago AutoCAD started including a DWG to PDF.pc3 file allowing AutoCAD users to use that tool rather than having to purchase a separate application to create PDFs. One advantage of using the DWG to PDF is that there is an option to save all the layers used in the DWG with the PDF file. With this setting enabled, anyone viewing the PDF through a PDF viewer has the ability to make one or more layers invisible. See the image below for an example:

Drawing Layers in PDF File

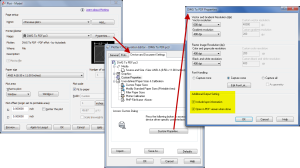
While this is a neat feature, you might not always want your list of layers to transmit with your PDF. If not, it’s easy enough to change the option. In the Plot dialog, set the current plotter to DWG to PDF.pc3 and then pick the Properties button to the right. Under the Device and Document Settings tab, you can change several options such as available paper sizes. You can also select the “Custom Properties” item in the tree for special options that are unique to the “printer”. You can see in the image below that this is where you can find the option for whether or not to “Include layer information”.
National CAD Standard: Common Language for CAD Users

This is a great article by Greg Jordan who is currently serving his second term as secretary of the NCS Steering Committee and also serves on the Civil Task Team with me.

NCS: Common Language for CAD Users


Did you know… About the CHSPACE command?

The CHSPACE (Change Space) command is simply a lifesaver for anyone using paper space to put together your project drawings.

In AutoCAD, CHSPACE can be typed in at the command line or found in the Modify menu or ribbon panel. In Carlson with IntelliCAD, CHSPACE can be typed in or easily accessed from the right-click context menu after the items have been selected.

This command will move entities from model space to paper space or vice versa. You must be working in model space through paper space in order to move entities from model to paper – it will not work directly from model space. The nice thing about the command is that it will scale the entities (to account for the differences in scale between model and paper space) so you don’t have to. The AutoCAD version of this command actually performs a MOVE command on the entity whereas the IntelliCAD version gives you the option of moving the original or making a copy to the other space. If you’re using AutoCAD, make a copy of the entity before performing the CHSPACE command.

I find this command most handy when I have a linear project such as a water line or force main extension project with many sheets of plan and profile that change direction. In model space, I make multiple copies of the North arrow and place them along the meandering alignment. Then, from paper space, I make each viewport active and use CHSPACE to move one of the copies to the paper space sheet.


Software Review: AutoCAD and IntelliCAD

The May 2012 issue of Professional Surveyor magazine has been published. This month they are featuring a software review I submitted: AutoCAD and IntelliCAD.

You can order your FREE subscription to the print version of Professional Surveyor here.

You can click here to learn more about Carlson Software‘s offerings that include IntelliCAD.