Did you know… About the Change Space Command?

Some of us are old enough to remember life without the CHSPACE command… and what a great addition it was when the command was finally introduced to AutoCAD several years ago. And, with the release of IntelliCAD 7, it’s now in that program as well.

CHSPACE is a command that allows you to move one or more entities from Model Space to Paper Space (or vice versa) very easily. In AutoCAD, the operative word there is “MOVE”. You have to be a little careful because the command does exactly that: It MOVES it from paper to model or from model to paper. In IntelliCAD, you are given the option of COPYing the selected entities from one space to the other.

The command actually does more than just move or copy selected entities, it also scales the entities by the viewport scale so they’re correct size-wise. For instance, let’s say that you have a drawing in model space that’s been rotated so that it more easily fits on a sheet of paper. Also in model space, you’ve inserted a North arrow. And, in paper space/layout view, you have inserted a title block at a scale of 1:1 (18″ x 24″, etc.). Inside of the title block, you’ve created a viewport you’ve scaled to 1″=40′.

For drafting purposes, it’s desirable to have the North arrow in paper space to that it can be moved around and positioned outside the viewport. If you’re in AutoCAD, the first step is to make a copy of the North arrow. If you’re using IntelliCAD, this step isn’t necessary. Then, while in paper space/layout view, double-click inside the viewport to make it active. Type CHSPACE at the Command: line. Follow the various prompts within the command and Voila! Your North arrow is now in paper space and it’s been scaled down by 40 times so that it fits properly on your title block.
Did you know… that you can print your CTB files?

Several years ago when I started my business, my first contract was as an outside CAD manager for a civil & land planning firm. In trying to document their pen weights, screening, etc. I found a utility available on Autodesk’s website that allowed me to export all the values in a CTB file to a .csv file that could be opened (and printed) with Excel.

Here is the old Autodesk Knowledge Base article – it still works for anyone using AutoCAD-based programs version 2007-2008.

Unfortunately, I haven’t been able to find a more current version of this utility until recently. Govert’s Tools has a program called PlotStyleViewer. You can download it here.

In his words,

This inspired me to create a CTB/STB view/print application that works completely independent of AutoCAD and Autodesk tools! The program consists of just one executable file, there are no other exe’s or dll’s needed. It should work with CTB’s/STB’s from AutoCAD 2000 upto the latest version. The purpose of this tool is that you can view CTB’s, print them and save as text file that you can open in Excel etc.

It’s a handy little utility and doesn’t seem to be limited to a particular version. Hope you get as much use out of it as I do.


Did you know… about DWG to PDF?

Since I have to send so many files to different people in PDF format, I purchased Adobe Acrobat several years ago. Once installed, “Adobe PDF” shows up in my list of available printers just like my HP or Brother printers do. There are also several other programs available online that allow you to create a PDF printer. Although I’ve never used them, I’ve heard good things about CutePDF and Sourceforge PDF Creator and I’ve used Win2PDF in the past. Each of these have a free version but you may end up getting a watermark or footer or 2nd page that states you’re using a Free copy.

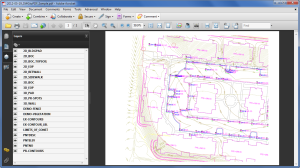
Any of these can be installed and will be shown as an available printer in the Plot dialog box of AutoCAD or IntelliCAD. Several years ago AutoCAD started including a DWG to PDF.pc3 file allowing AutoCAD users to use that tool rather than having to purchase a separate application to create PDFs. One advantage of using the DWG to PDF is that there is an option to save all the layers used in the DWG with the PDF file. With this setting enabled, anyone viewing the PDF through a PDF viewer has the ability to make one or more layers invisible. See the image below for an example:

Drawing Layers in PDF File

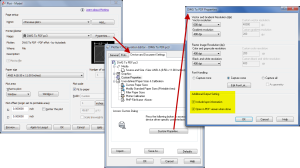
While this is a neat feature, you might not always want your list of layers to transmit with your PDF. If not, it’s easy enough to change the option. In the Plot dialog, set the current plotter to DWG to PDF.pc3 and then pick the Properties button to the right. Under the Device and Document Settings tab, you can change several options such as available paper sizes. You can also select the “Custom Properties” item in the tree for special options that are unique to the “printer”. You can see in the image below that this is where you can find the option for whether or not to “Include layer information”.


Did you know… About the CHSPACE command?

The CHSPACE (Change Space) command is simply a lifesaver for anyone using paper space to put together your project drawings.

In AutoCAD, CHSPACE can be typed in at the command line or found in the Modify menu or ribbon panel. In Carlson with IntelliCAD, CHSPACE can be typed in or easily accessed from the right-click context menu after the items have been selected.

This command will move entities from model space to paper space or vice versa. You must be working in model space through paper space in order to move entities from model to paper – it will not work directly from model space. The nice thing about the command is that it will scale the entities (to account for the differences in scale between model and paper space) so you don’t have to. The AutoCAD version of this command actually performs a MOVE command on the entity whereas the IntelliCAD version gives you the option of moving the original or making a copy to the other space. If you’re using AutoCAD, make a copy of the entity before performing the CHSPACE command.

I find this command most handy when I have a linear project such as a water line or force main extension project with many sheets of plan and profile that change direction. In model space, I make multiple copies of the North arrow and place them along the meandering alignment. Then, from paper space, I make each viewport active and use CHSPACE to move one of the copies to the paper space sheet.


Software Review: AutoCAD and IntelliCAD

The May 2012 issue of Professional Surveyor magazine has been published. This month they are featuring a software review I submitted: AutoCAD and IntelliCAD.

You can order your FREE subscription to the print version of Professional Surveyor here.

You can click here to learn more about Carlson Software‘s offerings that include IntelliCAD.


That CAD Girl – April 2012 Newsletter

In case you missed it, here is our April 2012 Newsletter


Thank you to the Richmond AutoCAD Manifest (RAM)

I’d like to thank Art Thomas and the Richmond Virginia AutoCAD User Group for inviting Jeremy and me to demonstrate Carlson Software and data collection last night. Our hour-and-a-half long presentation covered the basic tools and Survey, Civil and GIS specific features of the Carlson products.

The RAM User Group has been active for 20+ years and has a lot to offer CAD users in the central Virginia area. Their meetings are usually on the 3rd Wednesday of each month and start after work at 5:30. If you’re based in the Richmond area, I’d highly recommend that you join up with them.


Did you know… About Coordinate Display Toggles?

Did you know that, when you’re in AutoCAD or IntelliCAD, you have a couple of different options when it comes to displaying the coordinate position of your crosshairs?

For instance, when you’re NOT in a command, you have two options for displaying the coordinate position of your crosshairs as it moves across your screen: On or Off. If the coordinate display is toggled ON, then the X, Y and Z position (rectangular coordinates) of your crosshairs are displayed and if it’s OFF, then the X, Y and Z display is frozen and doesn’t update as your mouse moves.

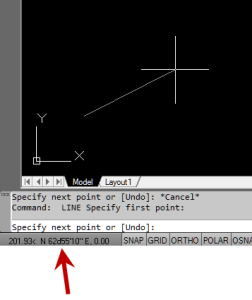
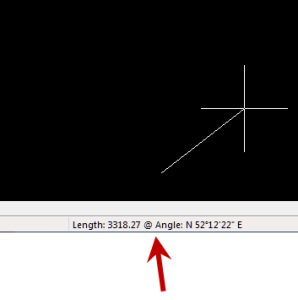
However, if you are currently in a command that requires two points be picked to specify an angle and distance (commands such as Line or Move, etc), you have a 3rd coordinate display available to you: polar coordinates. Unlike rectangular coordinates that display X, Y and Z position, polar coordinates report a distance and angle from the original point. For instance, when you start the Line command you can toggle the coordinate display so that rectangular coordinates are ON or OFF. But, after picking the first point of the line, you can toggle the coordinate display so that rectangular coordinates are ON, rectangular coordinates are OFF or that polar coordinates are ON.

The image below on the left shows the polar coordinate display in AutoCAD and the IntelliCAD version is shown below on the right:

IntelllliCAD Coordinate DisplayAutoCAD Coordinate Display


To toggle the coordinate display in newer versions of AutoCAD (since 2009?) double-click on the coordinate display. In older versions of AutoCAD and in IntelliCAD, the F6 button toggles the display.


Did you know… How easy it is to spruce up your dimensions?

Anyone who has worked with AutoCAD for any length of time can usually create a standard dimension object. However, if you pay close attention to two items in the Object Properties dialog box, you can get very creative with the way simple dimensions are displayed.

For instance, in the image just below, you can see that there are two Object Properties items highlighted in yellow. One is the “Measurement” and the other is the “Text override”. The Measurement is the measured distance between the dimension definition points (DEFPOINTS) and is read-only. You can also see that the current value for Text override is “< >”. Whenever the less-than and greater-than signs are shown as the Text override value, the Measurement will be substituted for the symbols when displayed in the drawing.

Dimension Example

To add just a little more detail to the dimension, you can add descriptive text before or after the “< >” in Text override as shown in the next example below. As long as you keep the “< >”, the correct measured distance will always be displayed as part of the dimension text:

Dimension Example 2And, making it fancier… In the example below, I have added a “P” between < > and “9 SPACES”. This is like pressing Enter to go to a second line and has the effect of stacking two lines of text above the dimension line:

Dimension Example 3

And, finally, one more option. Rather than entering “P”, if you enter “X” as part of your Text override, you will stack the text partially above and partially below the dimension line.

Dimension Example 4The “P” and “X” modifiers can also be used in combination to create 3 or more lines of text and allowing you to control how many lines appear above and how many appear below the dimension line.


Did you know… About Temporary Overrides?

There are others, but my two favorites are:

  • Holding Shift while in a Draw or Modify command allows you to override your current ORTHO setting.

So, if you’re drawing a line and ORTHO is Off, holding Shift will temporarily turn ORTHO On. As soon as you let up on the Shift key, ORTHO will be Off again. Likewise, if ORTHO is On, holding Shift will temporarily turn it Off.

  • Holding Shift while in the Fillet command allows you to override your current Radius setting and apply a Radius of 0.0 between the two selected entities.

So, if you’re drawing a parking lot and find yourself constantly changing your Fillet Radius between 0.0 and another value to create both sharp and rounded corners, leave the Radius set to something other than 0.0 and just hold Shift when you pick the two entities to apply a 0.0 Radius.


These Temporary Overrides are available in all “flavors” of AutoCAD as well as in IntelliCAD.