New Carlson Build – 120219

Carlson released a new build of their desktop software earlier this week. This includes updates to the IntelliCAD/for AutoCAD versions of Survey, Civil, Hydrology, GIS, Basic Mining, Geology, Underground Mining, Surface Mining, Natural Regrade, Field, Takeoff, Construction and Point Clouds.

To confirm your current build number, go to Help > About Carlson. You’ll see the build number on the top line of the text box.

You can download the latest full version or updates to your current installation here.

If you would like to try out any of the Carlson Software products for 30-days, email me here.

For those anxious to try out the very latest and greatest updates in the testing versions of IntelliCAD 7.1, you can also send me an email to gain access to a new blog, “The Little CAD Engine That Could”, administered by Leonid Entov of Carlson Software.

Participation in the testing and access to the blog is by invitation only, so email me and I’ll pass along your request.


Another Happy Carlson Customer

Here is a great story about another customer of mine, John Prevette with Gooden & Associates out of Hope Mills, NC, and his successful transition from Civil 3d to Carlson Civil Suite.

http://info.carlsonsw.com/blog-1/bid/121528/Moving-to-Carlson-from-Civil-3D
And, I know what you’re thinking but the answer is “No.” Carlson did not pay him to say this – I asked just to make sure! In all seriousness, it’s great he was willing to be interviewed and confirm just how great a design tool Carlson is and just how quickly you’re able to get up to speed.


Feedback from Aaron Hahn, Hahn Engineering & Consulting

I’ve been a little slack in requesting feedback from my customers over the past year so I was very pleased to receive the following unsolicited feedback from Aaron Hahn this week:

I purchased the Civil Suite last month and I wanted to thank you for all your pdf tutorials you posted on your site. They have been extremely helpful and they have made the switch from Civil 3D to Carlson quick and easy.

I can confidently say, that I prefer this software over Civil 3D already (used Civil 3D for years)! It’s faster, has more control, and is generally cleaner than Civil 3D. Clean and simple.

Thanks for all your help! Looking forward to getting up to speed on more of your tutorials and webinars 🙂

Aaron Hahn
Hahn Engineering & Consulting
British Columbia, Canada
Software Purchase – December 2011

See other testimonials here


Picks and Clicks: Field to Finish Follow Up

This article originally appeared in the December 2011 issue of Professional Surveyor magazine.

After we published “Understanding Field to Finish” in the September issue, I received more feedback and questions than I had for any other article to date. Although my plan for this month’s column had been “CAD Standards Part 2” (Part 1 is in the June issue), it makes more sense to answer some of the questions that were sent my way about Field to Finish first.

(I am using Carlson Survey for the examples in this article, but corresponding features and commands should be available as part of the Field to Finish feature of most other programs.)

The majority of readers’ questions revolve around how to code field descriptions and generate linework for multiple point codes. You use multiple point codes when you have a single field shot that defines more than one feature—for instance, a shot that locates both an edge of pavement and a sidewalk. However, before diving too quickly into multiple point codes, let’s make sure we have a good understanding of the different ways that you can use descriptions and linework codes to generate linework.


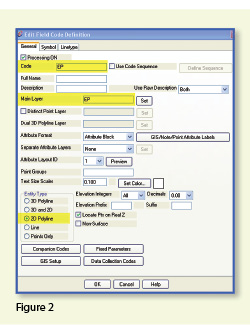
In Figure 1, the dotted lines represent the actual edges of pavement that exist in the field. Points 1-10 have a description “EP” designating them as Edge of Pavement.

When locating features that are generally symmetrical and that have two “sides,” such as a road, a sidewalk, or even a ditch having two tops of bank, we have a choice in how best to collect the points. Depending on field (and traffic) conditions, it may make more sense to take all the shots along one side of the road before crossing the road and taking all the shots along the opposite side.

The other way to collect shots is in what we call Zorro fashion: where we crisscross the street, taking shots on both sides, as we progress down the road. You can see that we used the Zorro style when taking shots in Figure 1. Point 1 is on the northwest side of the road, and shots 2 and 3 are on the southeast side. We then crossed back over to the northwest side to pick up 4 and 5, and so on.

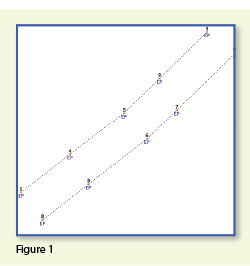
To draw the linework for the edges of pavement, you must create a field code for the EP description. You can see from Figure 2 that it requires only a couple of specific settings to indicate that this is a 2D polyline type of entity and on what layer the polyline is to be created.

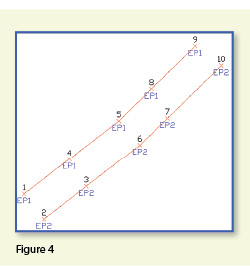
With the EP field code defined, using Field to Finish to draw points 1-10 generates the linework on layer “EP” (shown in red in Figure 3). Obviously this is not quite what we expected. I like to say that this is an example of the software doing exactly what we told it to do … rather than what we meant to tell it to do. So, we need to make a couple of adjustments.

The software understands only that it’s expected to connect all of the EP points with a 2D polyline. Carlson Survey allows you to choose whether the field code points are connected in “Sequential” order or “By Nearest Found.” The default setting is “Sequential,” which is why it connected the points the way it did. Unless we provide a little more information, there is no way for it to differentiate one edge of our pavement from another. If we make a minor change in the descriptions we use, we can have the program generate the linework correctly.

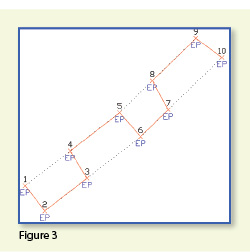
Rather than calling all edge of pavement points EP, we can use a number to modify the description so that we can tell the two polylines apart. We can use “EP1” for the northwest side and “EP2” for the southeast side. Now, when we redraw the points using Field to Finish, we end up with Figure 4, which is exactly what we wanted.

It is important to note that the field code does not change even though we’re now using EP1 and EP2 instead of EP. The field code is still “EP.”

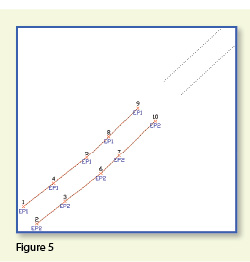
Let’s introduce just a little more complexity. Beyond points 1-10, we have an extension of this road with two additional edges of pavement that are shown as dotted lines in Figure 5. We do not want to continue the linework from points 9 and 10 but to start new polylines instead.

If we use descriptions EP1 and EP2 for the new edges of pavement, Field to Finish will assume we are continuing the other edges of pavement. So we must, again, have a way to differentiate the new edges of pavement from the ones drawn previously.

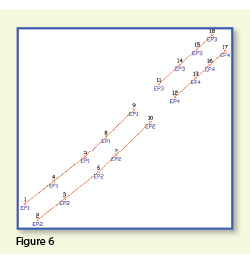
Using the same method as in the prior example, we can use descriptions “EP3” and “EP4” for the new edges of pavement. As you can see in Figure 6, this leaves us with the four separate polylines that we wanted.

The only drawback here is that the numbering of each distinct edge of pavement could get confusing on a large site. In this example, once they’ve been used, EP1 or EP2 can’t be used again without Field to Finish thinking all the EP1 points are part of the same polyline.

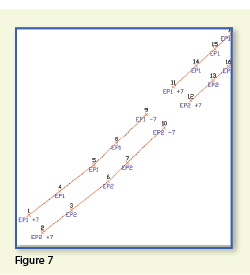
The good news is that it only requires another small coding difference to allow you to re-use EP1 or EP2 again. In Figure 7, we still use the EP1 and EP2 descriptions, but we use them in combination with special linework codes “+7” and “-7.” In Carlson lingo, “+7” is the default code to “Start a new polyline” and “-7” is the code to “End the polyline.” You can see that once we have descriptions “EP1 -7” and “EP2 -7” at points 9 and 10, we start new polylines by reusing EP1 and EP2 at points 11 and 12. As long as you’re diligent about using the “-7” special linework code to end the previously drawn polyline, you can reuse the descriptions.

Multiple Point Codes

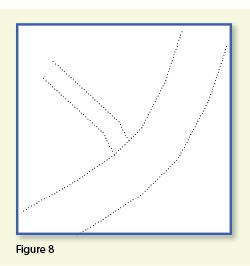
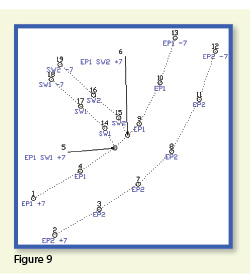
You use multiple point codes when you have two site features (such as the edge of pavement and a sidewalk) that intersect. As you can see in Figure 8 there are two points where a sidewalk meets the edge of pavement. In Figure 9, you can see the descriptions we used so we could have Field to Finish process points 5 and 6 as part of both the EP and SW linework entities.

Point 5’s description “EP1 SW1 +7” means that this shot is a vertex along the current EP1 polyline and also starts a new polyline named SW1 to define the edge of the sidewalk. Point 6’s description “EP1 SW2 +7” means that this shot is also a vertex along the current EP1 polyline and starts another new polyline named SW2 for the other side of the sidewalk.

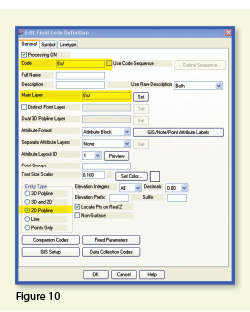
To have Carlson’s Field to Finish process these points as shown, we had to create only one additional field code: the “SW” code for sidewalk. We set the Entity Type to 2D Polyline and set the Main Layer to “SW” (Figure 10).

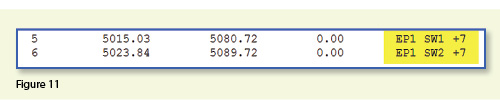
Now, let’s take a closer look at the descriptions for points 5 and 6 (Figure 11). In Carlson Survey, if you use a space between two descriptions, the program allows you to process them separately using the two corresponding field codes. The corresponding field codes used to process these descriptions are EP and SW so Carlson will process the same point twice, first using the EP field code and then again using the SW field code.

Because having a space in a point description is an indicator to Carlson that multiple field codes may need to be processed, it is a best practice to avoid using spaces in your descriptions. Using a description such as 24” RCP PIPE can create several problems, but the main one is that Carlson will think it is supposed to process three separate field codes: one for 24”, one for RCP and one for PIPE. A better description would be PIPE/24” RCP. In this example, a field code named PIPE would be processed. And, because a forward-slash (/) separates PIPE from 24” RCP, Carlson considers everything after the slash as a comment and will ignore it when processing Field to Finish.

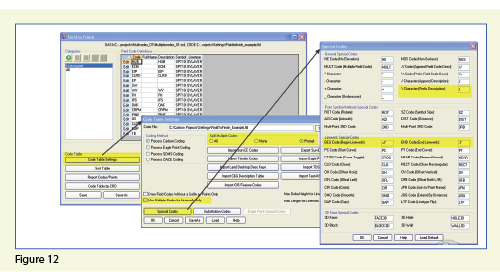
If you follow the maze of dialog boxes in Figure 12, there are several settings to take note of:

  • In the Code Table Settings dialog box, there are three possible settings for Split Multiple Codes.
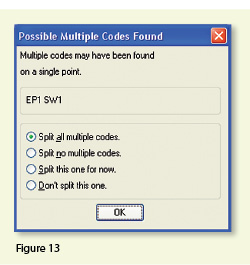
  • If you select “All,” any point description that contains a space will be processed as a multiple point code. If you select “None,” all spaces will be ignored when it comes to processing multiple point codes. If you select “Prompt,” you will be prompted with the dialog box from Figure 13 each time a space is encountered in a point description.
  • In the Code Table Settings dialog box, select the option to “Use Multiple Codes for Linework Only.” This causes Carlson Survey to create both the EP and SW linework on their respective layers but only one point (created on the layer specified by the first field code). If you do not select this option, the program will create two points with the same point number but with different descriptions. Each point will be inserted on the layer specified by its respective field code.

In the Special Codes dialog box, you can see the default settings and are able to customize the Special Codes used to process descriptions, points, and linework in Field to Finish.

With that, I hope I’ve been able to answer a few more of your Field to Finish questions. Please don’t hesitate to call or email as needed. I hope everyone has a fantastic holiday season, and I’ll see you back here in 2012!

This article originally appeared in the December 2011 issue of Professional Surveyor magazine.


Carlson 2012 Updates

You can download the most recent updates to Carlson’s 2012 desktop software HERE


End of Year Workshops – Statesville, Asheville, Wilmington and Raleigh NC

We are finally able to announce our end of year workshops for 2011. With the weather problems we encountered last year we decided to hold the events in the western end of North Carolina in November and toward the coast in December.

The cost to attend each event is $99 and lunch is included. See below for early bird registration details for each event. NC Licensed Surveyors and Engineers will receive 8 PDH credits and all attendees will receive a certificate confirming their attendance. We will have door prizes, software giveaways and special software or hardware pricing that is available the day of the show only.

We will be in Statesville on Tuesday, November 15th and Asheville on Thursday November 17th. Early bird registration is $89 through September 30th.

We will be in Wilmington on Tuesday, December 13th and Raleigh on Thursday December 15th. Early bird registration is $89 through October 31st.

You will be able to choose the sessions you wish to attend. This year’s sessions include:

  • GIS from A to Z and Responding to GIS-related RFPs
    presented by Janet Jackson (GIS Janet) of Intersect
  • Overview of Carlson Takeoff & Preparing Machine Control Data
    presented by Todd Carlson of Carlson Software
  • Intro to SurvNet & Least Squares
    presented by Donnie Stallings, the original developer of the product
  • CAD Standards Roundtable & Discussion
    presented by Jennifer DiBona, That CAD Girl
  • CAD Tips & Tricks and hints for sharing data with others
    presented by Jennifer DiBona, That CAD Girl
  • Overview of Carlson Software 2012 (Survey, Civil, Hydro, GIS, Point Clouds)
    presented by Scott Griffin of Carlson Software
  • Field to Finish with Carlson Survey & SurvCE and the Surveyor+ GPS System
    presented by Butch Herter of Carlson Software and Jeremy Taylor
  • Preview of future Carlson hardware
    presented by Butch Herter of Carlson Software and Jeremy Taylor
  • Road Design and Site Design with Carlson Civil & Hydrology
    presented by Scott Griffin of Carlson Software

Note that all classes are not scheduled at all events and locations. See each workshop announcement for specifics. Seats are limited so register online, call 919.417.8351 or email us to register.


Picks and Clicks: Understanding Field to Finish

This article originally appeared in the September 2011  issue of Professional Surveyor magazine.

Don’t be intimidated!

DEFINITIONSField to Finish—A general term used to describe the process of automatically drawing survey field data based on point descriptions and other field codes.Field Code (Description Key)—An alphanumeric code, corresponding to the point’s description, that defines how points are processed using Field to Finish. For points to be sorted onto a particular layer, be included in a point group, have a symbol inserted, or have linework that connects points be automatically generated, a Field Code having the point’s description must first be created.Field Code File (Description Key File)—A file that contains all of the Field Codes. 

Linework Codes—Codes entered before or after a point description that, when processed using Field to Finish, indicate where linework starts and ends or how to create additional, associated linework.

Somewhat like the seemingly Herculean task of developing CAD standards that I wrote about in the June issue, Field to Finish is one of those topics that almost everyone attending my workshops or training classes wants to learn more about. If they are not using Field to Finish, they think they should be—and, if they are already using it, they think they could be doing more or doing it better.

For those who are unfamiliar with it, Field to Finish is a general term used to describe the process of automatically drawing survey field data based on point descriptions and other field codes.


Depending on the survey software you use, Field to Finish may include some or all of these tasks:

  • insertion of survey points on to separate layers based on the point’s description,
  • sorting of points into point groups,
  • “tagging” of points, based on the point description, as “non-surface” points (this means that the points, even if selected, will be ignored when building a surface model),
  • insertion of a symbol onto a separate layer based on the point’s description or note,
  • rotation or scaling of a symbol based on the point’s description or note, and
  • drawing of 2D and/or 3D polylines connecting points based on the point’s description or note.

Although most survey programs can perform these or other tasks that fall under the Field-to-Finish header, to my knowledge, Carlson Survey is the only one to have commands or files that are actually named “Field to Finish.”


Land Desktop and AutoCAD Civil 3D use the term “Description Keys” for their feature that sorts points onto separate layers and inserts, rotates, and scales symbols. A separate feature called “Automatic Linework” or “Process Survey Linework” generates the polyline figures in these programs. For purposes of this article, Field to Finish refers to the generic term and, unless otherwise specified, applies to any survey program.

Benefits

For those who have never used Field to Finish, it can be summarized in one word: intimidating! But once you see what can be accomplished with a little extra coding, I believe you’ll be convinced it’s worth it. Because a picture is worth a thousand words, it’s easier to show you the benefits of Field to Finish.

The generic command for importing points (rather than Field to Finish) was used to import the points in Figure 1. In addition to overlapping attributes that make it hard to read, the points are all on the same layer, making connecting the dots even more time consuming and difficult.


However, if you use Field to Finish to import the points into the drawing, it looks like Figure 2. The points have been frozen in this view, but you can see the symbols and 2D and 3D linework that have been generated on their proper layers.


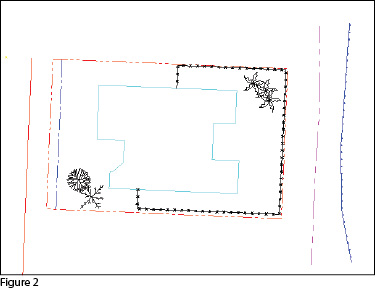
Granted, these examples demonstrate the power of Field to Finish when used to its fullest capacity, and it does require additional time and attention in the field to generate these results. In my training classes I encounter a lot of skepticism from folks who don’t believe the extra time in the field is worth it. While it may look cool, they say, it’s just easier to sort to layers, insert symbols, and connect the dots manually back in the office.

Bite-size Pieces

I respectfully disagree—and I believe that tackling significant changes in procedure is best accomplished with bite-size pieces rather than one big bite. Do you remember how you’re supposed to eat an elephant? One bite at a time, of course!

  • Nibble: Sort points onto separate layers and into point groups.
  • Snack: Tag points such as fire hydrants and inverts of manholes as “Non-Surface” points.
  • Bite: Specify symbols to be inserted on points where needed.
  • The whole enchilada—er—elephant: Also use special linework codes to connect points using lines or 2D polylines (for plan generation) and 3D polylines (for defining breaklines for surface models).
Point Description ConsistencyRegardless of the level of Field to Finish automation you strive for, the single biggest key to success with Field to Finish is consistency among the point descriptions. If you are attempting to implement Field to Finish for the first time and want to ensure buy-in from your field crews, allow them to help develop the list of descriptions. After all, they are the ones having to enter them in the field. If the folks in the field are not consistent with the descriptions they enter for each shot, Field to Finish is doomed to fail.For instance, in the office, it doesn’t matter whether the description for a fire hydrant is “FH,” “HYD,” or “FIRE HYDRANT.” Once the Field Code File has been created, it’s simply a matter of processing the Field to Finish routine. So, rather than someone in the office dictating what descriptions the field crew should use, ask the crew what description makes most sense to them and what they are confident they can remember and enter every single time.


Even though the “nibble” part seems simple enough, it still requires a considerable amount of thought and consideration. So, how do you start? First, determine what descriptions will be used for shots taken in the field. In order to use Field to Finish, you will need to create a field code for each description that may be processed now or in the future.


Start by going back to one or two of the largest point files you’ve worked on recently and sort it out based on the point descriptions in it. Use this list as a guide to determine what descriptions to keep and what to throw out and also to trigger your memory for other descriptions that may be used in the future.


Once you’ve completed your list of descriptions, each description must be defined as a Field Code (Description Key) in the software. It’s during this step that layers can be assigned for the points, symbols can be specified for insertion, point groups can be defined, and non-surface points can be tagged. Depending on the software you use, the dialog boxes and interface will be different, but the data and settings entered are generally the same.


For Carlson Software users, there is a routine in the “Draw Field to Finish” dialog box that automatically creates a Field Code Table (populated with Field Codes) from a Coordinate File. If you’re not using Carlson Survey, I recommend opening your point file in Microsoft Excel to sift through and sort the list of descriptions.


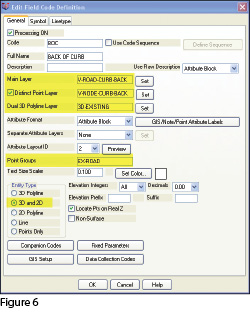
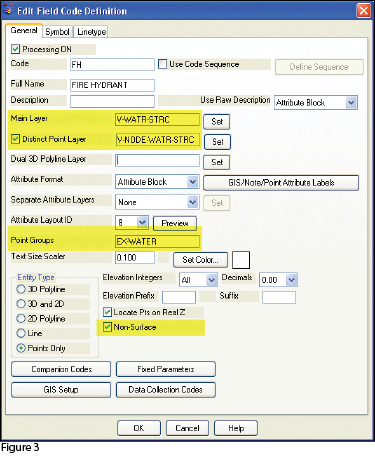
The Field Code that processes points with an FH description, as defined in Carlson Survey 2012, is shown in Figure 3. On the “General” tab of the dialog box, note the highlighted areas that show the layers, point group, and the checkbox to tag points as non-surface. Importing points with an FH description and using the “FH” Field Code definition results in the symbol named SPT16 being inserted on the layer V-WATR-STRC, the point being inserted on layer V-NODE-WATR-STRC, and the point included in a point group named EX-WATER.


The “Symbol” tab of the dialog box (Figure 4) is where you specify the symbol name and various other rotation, scale, and insertion settings.

Connecting All Your Points

As I stated previously, it’s a reasonable goal to get to the point where Field to Finish is used to sort points and/or symbols onto their proper layers and into point groups and to tag some points as non-surface to keep them from being included in a surface model. These are office-only tasks, because using Field to Finish to complete them does not require anything from the field crew other than consistency when entering point descriptions.However, the ultimate goal is having Field to Finish connect all of your points with 2D and/or 3D linework. Compared to the previous tasks, this requires more buy-in from the field crew because of the additional coding and noting.


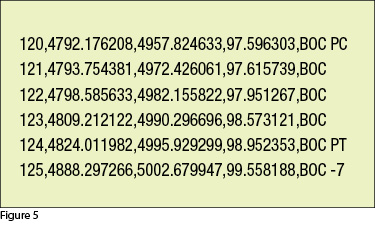
In Figure 5 you can see the linework coding that has been added to the “BOC” (Back of Curb) point descriptions in the sample of the point file. The “+7” linework code instructs the program to begin drawing linework, and the “-7” instructs it to stop drawing that piece of linework. The “PC” and “PT” identify the starting and ending points of a curve that fit all points in between the PC and PT.

The Field Code that processes points with a BOC description is shown in Figure 6. If you use the linework codes from the point file along with the BOC Field Code definition, it results in a 2D polyline on layer V-ROAD-CURB-BACK that starts at point 119 and goes to point 120. Then it goes into a curve that best fits between points 120 and 124 and ends with another tangent line from point 124 to point 125. A 3D polyline connecting the same points will also be drawn on layer 3D-EXISTING. In addition, the points will be inserted on layer V-NODE-CURB-BACK and included in a Point Group named EX-ROAD.


And this is just a sample of what can be done using Field to Finish. Depending on your software and data collector firmware, there are many other linework codes that can be used to automate the creation of linework based on your point descriptions and notes. In some cases there are specific linework codes that must be used, such as “B” for Begin linework (instead of the +7 used above) or “E” for End linework (instead of -7). Other programs, like Carlson, allow you to customize these codes. The “Special Codes” dialog box in Figure 7 shows the default linework codes used in Carlson Survey 2012.


I have one last piece of advice for those who are considering jumping into the world of Field to Finish for the first time. Cheat! Well, kinda. Every survey program with a Field to Finish feature has sample files that you can use as-is or modify to meet your needs. Rather than starting from scratch, it’s sometimes easier to work with one of those prepared files.


As always, I encourage you to send your feedback or contact me with questions at [email protected].

This article originally appeared in the September 2011 issue of Professional Surveyor magazine.


What is LandXML?

This article originally appeared in the April 2011  issue of Professional Surveyor magazine.

The ability to import and export LandXML data has been around for quite a while, but I still get a lot of curious looks when I mention it in my training classes. So, what is it, and why should you be using it?

What Is LandXML?

LandXML refers to a file format (.xml) containing data that has been generated from a civil engineering or land surveying software program.

If you’re hearing about it for the first time and want to learn more about the uses and acceptance of the LandXML initiative, visit www.landxml.org. According to their page LandXML.org in a Nutshell, “… LandXML.org is committed to providing a non-proprietary data standard (LandXML), driven by an industry consortium of partners.”

Simply put, the easiest way to convert, transfer, and archive data between Civil 3D, Carlson Software, Land Desktop, Eagle Point, TerraModel, and many other programs is to use the Import from LandXML and Export to LandXML functions available in these programs. Additionally, many machine control systems allow you to import LandXML files. I am most familiar with the Carlson and Autodesk families of civil/survey programs, so most examples in this article refer to them.

This may not be current by the time you read this article, but the list of members and participating organizations is at www.landxml.org/org.htm.

Why You Should Use It To Transfer Data

The two key words in the mission statement above are “non-proprietary.” Just as we have multiple proprietary drawing file formats such as .dwg (from Autodesk’s AutoCAD-based programs) and .dgn (from Bentley’s Microstation), the files that store survey and civil data such as points, surfaces, centerlines, and profiles are unique and proprietary to their manufacturer.

For instance, Civil 3D is the survey/civil product for Autodesk. Points and surfaces created in that program are stored inside the .dwg file. If you have Civil 3D and need to share a surface with a consultant or other team member who owns the same version of Civil 3D, you can just send them the .dwg file and they will have full access to the point and surface data. However, if you have Civil 3D and your consultant uses an earlier version of Civil 3D, Land Desktop, or Carlson Software or needs the surface data for machine control, it will not be as simple as just sharing the .dwg file.

Similarly, surfaces created in Carlson Software are saved in a .tin file and points are stored in a .crd (coordinate) file. Anyone using Carlson Software or SurvCE data collectors can load these files in their native format. But, Civil 3D or other survey/civil programs can’t access them directly.

As you probably already know, when you have to pass this data onto someone using a different program, it’s a nightmare! This is where LandXML is a lifesaver.

I like to explain that you use Land-XML files in the same way you used to rely on .dxf files. It’s mostly outdated now, but a .dxf file is a generic drawing file (DXF = Drawing Interchange File) that can be exported from and imported into various CAD programs. Back in the day, AutoCAD wasn’t able to read or import Microstation’s .dgn files and Microstation wasn’t able to read or import AutoCAD .dwg files, but both could export and read .dxf files. To get a Microstation file into AutoCAD, we had to export a .dxf file from Microstation and import it into AutoCAD and vice versa.

When you export your civil/survey data to an .xml file, it can be opened and read like a text file. Specifically, an .xml file is an .html file that is best viewed through a web browser such as Internet Explorer or Firefox. For instance, when a surface model (TIN) is exported to an .xml file, the X, Y, Z values of each point on the TIN are assigned a number, and then each “face” (triangle) of the TIN is defined by specifying the three corners (Figure 1).

Another benefit of using LandXML to transfer project data is that you can be selective in choosing what project data to include in your .xml file. For instance, in the course of a design project, you may create an existing ground surface, a proposed ground surface for phase one of your project, and a proposed ground surface for phase two. You may have a consultant who needs only your proposed ground surfaces. When you export the .xml file, you have the ability to select only those surfaces that you’d like to add to the file; it’s not necessary to export them all.

For Project Archiving

We’ve all become accustomed to saving archive copies of our drawing files for various purposes, but saving the corresponding project data such as points, point groups, surfaces, centerlines, and profiles is often overlooked. Retrieving the drawing file (.dwg or .dgn) may allow you to recover the linework that represents contours or a profile, but the underlying “surface” is lost unless the project data was also archived.

When archiving your projects at completion or even at submittal time, it is not enough to simply save a copy of the drawing file(s) for the project; you must also save a copy of the project data. At a minimum, the archive should contain the project data in its native format. In the case of Civil 3D, saving your project data in its native format means saving a copy of all .dwg files that store points, surfaces, or other data relating to your project. Saving this project data in its native format is sometimes the easiest method, but it can also create a problem with file storage because the files can become enormous.

This won’t be a surprise, but even if you archive your project data in its native format, I recommend that you consider additional archiving in .xml format. This is the case whether you need to save a progress, submittal, or final archive of your data. No one knows what kind of data files we’ll be using 10 or 20 years down the road, so saving your data in such a generic, text-based format such as .xml files allows for easier retrieval regardless of when you need it.

Note that, like archiving in native format, archiving to an .xml file can also produce very large files. I still believe using the .xml format is advantageous because of the generic nature of the data and having the ability to pick and choose the data you need to archive.

I hope you’ve gotten some clarification on this fantastic tool we’ve all had for years but many of us have not taken advantage of. If you have questions, please don’t hesitate to follow up.

This article originally appeared in the April 2011 issue of Professional Surveyor magazine.


Upcoming Regional Training Classes – Columbus OH, Raleigh NC, Atlanta and Baltimore

After many requests to hold training classes in different areas of the country, I’ve finally managed to schedule a few dates. The classes are 8 hours of hands-on training and seats are limited. Registration deadlines and pre-requisites vary for each class – Click the link below for the class announcement.

Classes include Intro to Survey, Surface Modeling, Least Squares/SurvNet, Quantity Takeoffs and Drawing Prep for Surface Modeling among others.

Call 919.417.8351 or [email protected] to register.


What is Carlson up to?

This is a good article about Bruce Carlson and where Carlson Software is planning to go in the future…

Independence All the Way

Originally posted on Carlson Connection by Jennifer Dibona