This article originally appeared in the April 2011 issue of Professional Surveyor magazine.
The ability to import and export LandXML data has been around for quite a while, but I still get a lot of curious looks when I mention it in my training classes. So, what is it, and why should you be using it?
What Is LandXML?
LandXML refers to a file format (.xml) containing data that has been generated from a civil engineering or land surveying software program.
If you’re hearing about it for the first time and want to learn more about the uses and acceptance of the LandXML initiative, visit www.landxml.org. According to their page LandXML.org in a Nutshell, “… LandXML.org is committed to providing a non-proprietary data standard (LandXML), driven by an industry consortium of partners.”
Simply put, the easiest way to convert, transfer, and archive data between Civil 3D, Carlson Software, Land Desktop, Eagle Point, TerraModel, and many other programs is to use the Import from LandXML and Export to LandXML functions available in these programs. Additionally, many machine control systems allow you to import LandXML files. I am most familiar with the Carlson and Autodesk families of civil/survey programs, so most examples in this article refer to them.
This may not be current by the time you read this article, but the list of members and participating organizations is at www.landxml.org/org.htm.
Why You Should Use It To Transfer Data
The two key words in the mission statement above are “non-proprietary.” Just as we have multiple proprietary drawing file formats such as .dwg (from Autodesk’s AutoCAD-based programs) and .dgn (from Bentley’s Microstation), the files that store survey and civil data such as points, surfaces, centerlines, and profiles are unique and proprietary to their manufacturer.
For instance, Civil 3D is the survey/civil product for Autodesk. Points and surfaces created in that program are stored inside the .dwg file. If you have Civil 3D and need to share a surface with a consultant or other team member who owns the same version of Civil 3D, you can just send them the .dwg file and they will have full access to the point and surface data. However, if you have Civil 3D and your consultant uses an earlier version of Civil 3D, Land Desktop, or Carlson Software or needs the surface data for machine control, it will not be as simple as just sharing the .dwg file.
Similarly, surfaces created in Carlson Software are saved in a .tin file and points are stored in a .crd (coordinate) file. Anyone using Carlson Software or SurvCE data collectors can load these files in their native format. But, Civil 3D or other survey/civil programs can’t access them directly.
As you probably already know, when you have to pass this data onto someone using a different program, it’s a nightmare! This is where LandXML is a lifesaver.
I like to explain that you use Land-XML files in the same way you used to rely on .dxf files. It’s mostly outdated now, but a .dxf file is a generic drawing file (DXF = Drawing Interchange File) that can be exported from and imported into various CAD programs. Back in the day, AutoCAD wasn’t able to read or import Microstation’s .dgn files and Microstation wasn’t able to read or import AutoCAD .dwg files, but both could export and read .dxf files. To get a Microstation file into AutoCAD, we had to export a .dxf file from Microstation and import it into AutoCAD and vice versa.
 When you export your civil/survey data to an .xml file, it can be opened and read like a text file. Specifically, an .xml file is an .html file that is best viewed through a web browser such as Internet Explorer or Firefox. For instance, when a surface model (TIN) is exported to an .xml file, the X, Y, Z values of each point on the TIN are assigned a number, and then each “face” (triangle) of the TIN is defined by specifying the three corners (Figure 1).
Another benefit of using LandXML to transfer project data is that you can be selective in choosing what project data to include in your .xml file. For instance, in the course of a design project, you may create an existing ground surface, a proposed ground surface for phase one of your project, and a proposed ground surface for phase two. You may have a consultant who needs only your proposed ground surfaces. When you export the .xml file, you have the ability to select only those surfaces that you’d like to add to the file; it’s not necessary to export them all.
For Project Archiving
We’ve all become accustomed to saving archive copies of our drawing files for various purposes, but saving the corresponding project data such as points, point groups, surfaces, centerlines, and profiles is often overlooked. Retrieving the drawing file (.dwg or .dgn) may allow you to recover the linework that represents contours or a profile, but the underlying “surface” is lost unless the project data was also archived.
When archiving your projects at completion or even at submittal time, it is not enough to simply save a copy of the drawing file(s) for the project; you must also save a copy of the project data. At a minimum, the archive should contain the project data in its native format. In the case of Civil 3D, saving your project data in its native format means saving a copy of all .dwg files that store points, surfaces, or other data relating to your project. Saving this project data in its native format is sometimes the easiest method, but it can also create a problem with file storage because the files can become enormous.
This won’t be a surprise, but even if you archive your project data in its native format, I recommend that you consider additional archiving in .xml format. This is the case whether you need to save a progress, submittal, or final archive of your data. No one knows what kind of data files we’ll be using 10 or 20 years down the road, so saving your data in such a generic, text-based format such as .xml files allows for easier retrieval regardless of when you need it.
Note that, like archiving in native format, archiving to an .xml file can also produce very large files. I still believe using the .xml format is advantageous because of the generic nature of the data and having the ability to pick and choose the data you need to archive.
I hope you’ve gotten some clarification on this fantastic tool we’ve all had for years but many of us have not taken advantage of. If you have questions, please don’t hesitate to follow up.
This article originally appeared in the April 2011 issue of Professional Surveyor magazine.
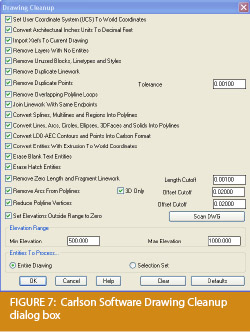
 encountered the proverbial drawing from “you-know-where” that seems to drive us crazy from start to finish. Here I offer several tips to help you identify problems and conquer your problem drawings. I’ve listed these tips in the order I would apply them.